Tuesday, March 27, 2007

WPF/E - GeoPhoto - A User Control With Fun in Mind

UPDATE - 05.06.2007 - The content of this post is no longer valid with the 1.0 beta release of Silverlight.

Greetings,

One of my hobbies is Geocaching. Because of this, I decided to keep a blog regarding my caching adventures. I wanted this blog to be very heavily focused on pictures and location to help readers connect with the locations. This seemed like a perfect opportunity to create a reusable component that would allow me to load location specific images. The control displays images and if the "swap" icon is selected, a Virtual Earth map of the location of the photo is displayed. Hence the birth of GeoPhoto.

On the WPF/E side of the ball, this component is interesting because it demonstrates some very powerful, and valuable, techniques including:
  • Displaying HTML content ON TOP OF WPF/E content. I have not seen this implemented elsewhere. Everything else I have seen involves displaying WPF/E content on top of HTML content
  • Exposing ASP.NET user control properties to client (JavaScript) code
  • A fairly smooth slider "control".
  • Converting data from an XML file into JavaScript objects that are used throughout the application.
  • Creating a TRUE User Control in that you can actually use it several times on the same page.

This control reads the image: source, latitude, and longitude values from an xml file. The xml file location is actually exposed as a property of the user control. This control allows you to do the following:
  • Define the source of a picture and it's latitude, longitude
  • Define a latitude and longitude for a group of pictures
  • Define picture groups for multiple locations.

Please bear in mind, this control can be expanded upon to be more robust. This was primarily designed to be used for a specific case, and then I expanded it to be a bit more reusable, then I decided to share it through my blog. I hope you find it useful. There are several items that can definately be improved upon. One item is I would like to utilize the Downloader object more. Another one of these items is the fact that the control currently doesn't work in Firefox. I believe there is a bug in the Feb CTP that does not allow the SourceElement of a WPF/E control to be accessed when attempted through Firefox. I have posted a question on the forum regarding this. I hope to find some time to remedy this, and if so, I will definately make a post about it (so make sure you use the RSS subscription :)).

Over the next couple of weeks, leading up to MIX '07, I intend to write some more detailed posts regarding some of the points listed above. These posts will be based on the GeoPhoto control, and now is as good as time as any to make this control available. I look forward to your comments.

Project Information
    Source Code: here
    Requirements: WPF/E February 2007 CTP

Monday, March 19, 2007

WPF/E - How to get the id of the hosting WPF/E control

UPDATE - 05.06.2007 - The content of this post is no longer valid with the 1.0 beta release of Silverlight.

The February 2007 CTP of the WPF/E SDK provides the "GetHost" method which enables ANY UIElement to get the hosting WPF/E control of the object. Unfortunately, there is not a property or method that exposes the ID of the WPF/E control (as of the Feb 2007 CTP). In the event you are attempting to create a reusable component, you will probably want the ID of the control so that you can reuse all of the JavaScript you have laboriously authored :)

After reviewing the items available through the WPF/E control API, I settled on an approach that seems usable. I used the SourceElement property when I declared my WPF/E control. Click the button below to display the WPF/E control information.

The key item to notice is that these are two seperate instances of the same xaml file. The source code for this implementation is available at the end of this post.

I simply declared the WPF/E control in the HTML as follows:

<div id="wpfeControl1Host">
  <script type="text/javascript">
    new agHost
    (
      "wpfeControl1Host", // hostElementID (HTML element to put WPF/E control into)
      "wpfeControl1", // ID of the WPF/E ActiveX control we create
      "400", // Width
      "400", // Height
      "white", // Background color
      "wpfeControl1", // SourceElement (name of script tag containing xaml)
      "plugin.xaml", // Source file
      "false", // IsWindowless
      "30", // MaxFrameRate
      null // OnError handler
    );
  </script>
</div>

Notice the relationship between the "ID of the WPF/E ActiveX control", the "SourceElement" property, and the
id of the containing "Div" element. The relationships are as follows:
  • The "SourceElement" is set to the ID of the WPF/E ActiveXControl
  • The "hostElementID" is set to the "SourceElement" + a unique number to identify the instance
  • The "id" of the "div" tag is set to the "hostElementID". I point this out simply because if you are using this as a checklist you can just go down the list.
This naming structure is implemented to give us the flexibility of obtaining BOTH the id of the WPF/E ActiveX control and the id of the hosting element from the JavaScript. Now that we have setup the relationships we can obtain the various
IDs.

Using the "WPF/E JavaScript Application" Visual Studio 2005 Template asa basis, simply replace the "handleMouseUp" function
with the following:

function handleMouseUp(sender, eventArgs)
{
  var gradientStop1 = sender.findName("gradientStop1");
  var gradientStop2 = sender.findName("gradientStop2");
  gradientStop1.offset = 1;
  gradientStop2.offset = .403;

  // Obtain a reference to the WPF/E control
  var wpfeControl = sender.GetHost();
  var displayString = new String();

  // Display the ID of the ActiveX (WPF/E) control
  displayString += "The ID of the ActiveXControl is " + wpfeControl.SourceElement + "\n\n";

  // Display the ID of the HTML element that is hosting the control
  var hostingElementID = wpfeControl.SourceElement + "Host";
  displayString += "The ID of the Hosting HTML element is " +   hostingElementID + "\n\n";

  // Display the HTML of the "control" for the sake of proof
  if (document.all)
  {
    var hostingElement = document.getElementById(hostingElementID);
    displayString += "The HTML of the \"control\"\n";
    displayString += "-------------------------------------------";
    displayString += hostingElement.outerHTML;
  }
  alert(displayString);
}

I settled upon this approach primarily because it worked :). However, I was originally led down the path because of the comment in the HTML file that states "// SourceElement (name of script tag containing xaml)". I think the confusion is because of there seems to be a discrepency between this comment and the contents of the information within the SDK for the "SourceElement" property. I look forward to your comments.

Project Information
    Source Code: here
    Requirements: WPF/E February 2007 CTP

Saturday, March 17, 2007

Misc - New Layout

I came to the decision that I didn't like the appearance of my blog. Thus, I decided to move forward with a redesign. In selecting a design, I wanted to make the following improvements that I felt were lacking from the previous version.
  • Improved Readibility - The font is now larger, more distinct, and clearer
  • Focus on Content - WPF and WPF/E can more easily standout as the focus of a blog post now
  • Community Involement - Links are now available to those sites that are directly related to this blog's content. Including blogs that link to this site and other resources. In addition, I registered for feedburner to help guauge reader interest level. So if you are already a subscriber, I would appreciate it if you update your rss feed url through the "Subscription" link on the right side of the page.
  • Flexibility - I would like to incrementally include WPF/E content into this blog.
  • Navigation - Personally, I ran into difficulties finding content on my own blog. The use of the hierarchy control has simplified this process.


I hope you like the new design. I hope to have some new .NET related content posted soon.

Sunday, March 11, 2007

WPF/E - MIX Bling

UPDATE - 05.05.2007: The content of this post is no longer valid with the 1.0 beta release of Silverlight. The updated post and source code can be found here.

Hola! I'm getting pumped for Mix and I haven't seen a lot of bling out on the web yet. So I decided to add my 2 cents to the mix (no pun intended).

I've posted the code and this can be easily extended to implement some functionality with the buttons to make this a full blown media player. In fact, this component was created to host a 320x240 video. Originally, I wanted to display this component horizontally instead of vertically, which is why the borders are a little messed up. The source code available for download is actually the horizontal version so the borders of the device look better. Enjoy!

Project Information
    Source Code: here
    Requirements: WPF/E February 2007 CTP

Wednesday, March 07, 2007

WPF/E - How to Create a Media Player

[Spoiler Alert] - This content will be presented at the Kentucky .NET User Group on March 8th, 2007 [/Spoiler Alert]

During the March 8th, 2007 Kentucky .NET User Group meeting I will be presenting an overview of WPF/E. In addition to the overview, I decided it would be helpful to provide a walkthrough of creating a media player to familiarize individuals with the platform.

While I was practicing presenting, I decided to record my presentation and try my hand at my first webcast. If you decide to watch the webcast, I would recommend waiting for the video to be 10% downloaded before clicking the "play" button. I apologize for the inconveniance, however, my presentation has a time limit and I was trying to focus on a lot of the core features of WPF/E. I will try to blog on an intelligent download/playback handler sometime in the near future. Please let me know if you have any questions.

Project Information
    Presentation: here
    Duration: 44:23
    Source Code: here
    Requirements: WPF/E February 2007 CTP

Saturday, March 03, 2007

WPF/E - How to dynamically load a XAML File

UPDATE - 05.05.2007: This content of this post is no longer valid with the 1.0 beta release of Silverlight. The updated post and source code can be found here.

Recently on the WPF/E forum someone was asking about how to dynamically load a XAML file. This post will explain how to accomplish this.

One of the great features of WPF/E is the fact that it is consistent with an established web architecture. At a high-level overview, within a webpage, a WPF/E component is hosted within an HTML element and you can use JavaScript to interact with the XAML content.

When working with XAML within the web architecture, it is important to remember both the Document Object Model (DOM) and the WPF/E Object Model.

Now let's get into the details of how to solve the problem of dynamically loading a XAML file. This really cool part is that we can do this in three easy steps.

  1. Reference the WPF/E control via the Document Object Model (DOM).
    var wpfeControl = document.getElementById("wpfeControlID");
     
  2. Use the "Source" property of the WPF/E control to specify a XAML file.
    wpfeControl.Source = "pathToXamlFile.xaml";
     
  3. Reload the content of the WPF/E control with the contents of XAML file referenced by the "Source" property.
    wpfeControl.Reload();
For larger xaml files, it's generally recommended to use the Downloader object to enhance the user's experience. Here is a sample that loads a different .xaml file based upon the selected item. In addition the code for this sample is posted below. Thanks alot!

Project Information
Source Code: here
Requirements: WPF/E February 2007 CTP

Friday, February 16, 2007

WPF/E - Movie Slider Puzzle (Take 2)!

UPDATE - 05.05.2007 - The content of this post is no longer valid with the 1.0 beta release of Silverlight. The updated post and source code can be found here.

I decided that I wanted to play with the following WPF/E elements/features:
  • MediaElement
  • Clip
  • Drag and Drop functionality
  • The Downloader object
In the process I created a slider puzzle whose pieces are based upon a video! A sample of the project and the source code is available below. Please be patient as it may take a couple of minutes to download the video. You will know that the video is loaded when the playback buttons are positioned below the play surface. The video provides the following functionality:
  • Play/Pause
  • Stop
  • Re-scatter the pieces
  • Order the pieces in case you grow impatient :)
The project works by taking the video and measuring 9 pieces. Then, the video is loaded 9 separate times, one for each piece, which is defined as a Canvas. This is necessary because you can't actually cut up a video. This reveals the power of the "Clip" property. Each piece contains a clip that is the size of the piece. After the clip is in place, some good old-fashioned mathmatical calculations are used to define how to offset the position of the video within the canvas. If you look in the code, you'll notice that we use negative values to define the Canvas.Left and Canvas.Top proerties of the MediaElement. This positioning, in conjunction with the previously defined Clip, define what part of the video is visible to the user.

I look forward to your comments. This example can be improved upon, but I'm pretty excited about it. Enjoy!

Project Information
Source Code: here
WPF/E Runtime: Febuary 2007 CTP

Tuesday, February 13, 2007

WPF/E - The Matrix Reloaded

Bryant has taken the Matrix example and really polished it up. You can see the new and improved version here.

Great work Bryant!

Tuesday, February 06, 2007

WPF/E - How to Animate your Name!

Hey Readers...

During my undergraduate career I studied computer science. I was looking to expand my knowledge into working with some technologies that were closer to the user experience. Because of this, I took a Flash class in another department. One of the required projects was to create a basic animation that would animate our name. At that time, the movie "The Matrix" was pretty big, so I used that as the premise for the animation. I'm sure you've all seen it.

I decided to take that animation and re-create it using WPF/E. My main focus was I wanted to see how efficient the JavaScript was while attempting to "animate" (please note, I'm not using the WPF/E Animation, rather animation via JavaScript) several items. The code for this project is available here. It would definately have been more savvy to let the JavaScript generate the textblocks. However, I wanted to see how the technology would perform with the manipulating each textblock individually. I was very happy with the result.

If you have any questions about the code, please feel free to post a comment. In addition, I have some ideas for some other types of controls I would like to post over the next couple of weeks, so stay tuned! Now, here is the little name animator. Enjoy!


NOTE: This code was written with the WPF/E Febuary 2007 CTP

Monday, February 05, 2007

WPF/E - How use drag and drop

One very important feature of rich internet applications is the ability to implement drag-n-drop. Lorin from the WPF/E Developer Content Team has posted a great walkthrough of how to implement drag-n-drop within WPF/E. In addition, there is a demo application.

Personally, one of the cool features that I noticed was, if you drag and drop the sunglasses on the dog, you can still see the dogs eyes. I really appreciated the fact that the sunglasses utilized other WPF content instead of just using a bitmap. It demonstrates how powerful the platform is.

Wednesday, January 31, 2007

WPF/E - Febuary CTP & SDK Released!

Microsoft has released the latest WPF/E CTP. You can download the Windows version from here and the Mac version from here.

You may download the SDK from here. In addition, the online reference for the SDK may be found from here.

MSDN Forums - Achievement(s) Unlocked

Hello!

One of my goals for this blog and the community for 2007 was to be more active in the forums. At the end of the first month of 2007, I noticed that I managed to land in the top 10 on both the WPF and WPF/E forums! Keep the questions coming!


P.S. I believe they are getting ready to release the next WPF/E CTP. I tested viewing this post and the following error appeared. I'll put a post up when its out.

Monday, January 22, 2007

WPF/E - A basic WPF/E User Control

UPDATE - 05.05.2007 - The content of this post is no longer valid with the 1.0 beta release of Silverlight. The updated post and source code can be found here.

Recently, I wanted to learn about WPF/E so I created an ASP.NET User Control that takes the images from a specified directory and rotates through them and displays their reflection. I will admit, this posting is a bit light on pure information, however, I still wanted to share what I learned and the code I wrote. If you have any questions, please post a comment and I will be glad to answer them. (you can get the source code here):

I am not saying this is the best how-to on this type of thing, in fact, there are several improvements that can be made to the implementation. Rather, I created this as a proof-of-concept for myself, so I thought I would share what I learned along the way.
  • I was pretty impressed with the ease in using this technology. If you are familiar with JavaScript, you are going to find it easy to work with WPF/E. A long time ago, I learned ActionScript. It's mediocre, but personally, I would rather work with a widely used language such as JavaScript when developing. I'm very thankful the WPF/E team decided to use JavaScript instead of trying to develop some other new scripting language.
  • I really appreciated the fact that because WPF/E is in open text platform (it uses xml and JavaScript), the installation requirements fall on the client side. This was great because my hosting service doesn't have .NET 3.0 components installed, yet I was still able to deploy this sample.
  • I actually used the Microsoft Expression Blend Beta 1 for the graphics implementation. I was extremely pleased to see that I had to make ZERO changes to the xaml in order to get it to work within WPF/E. Very slick.
  • I had some difficulty deploying the application because the .xaml MIME type was not registered correctly on the hosting server. I do not own the server so I could not see what had happened. Shawn Wildermuth pointed out that sometimes you can have success deploying an application by using the .xml extension in place of .xaml. This is useful if you are having difficulty in getting .xaml registered as a mime-type. This little tip allowed me to get the WPF/E control you are seeing above deployed.


I plan on presenting on WPF/E in the Louisville, KY and Indiana geographies over the next couple of months. So if you're in the area and interested in this technology, please view the user group websites for more information.

once again, the source code is here if you would like it.

P.S. I just made the cut-off for my one-a-week posting goal by 27 minutes :)

Sunday, January 14, 2007

WPF - What's the difference between XBAPs and WPF/E Applications?

I was recently trying to determine what the differences are between XBAPs and WPF/E applications. At first glance, they are both browser based solutions, so I was wondering about what the potential catch was. If you (the reader) have/know of any more please let me know and I will gladly update this posting. At this point, this is a list of some of the core items I've found:

  • WPF/E Applications
    • Are cross-platform ready (Mac OS X and Windows)
    • Do not require the client to have the .NET 3.0 runtime. Instead, WPF/E applications run within a browser plugin.
    • Do not support code-behind
    • Rely on JavaScript

  • XBAPs
    • Require the client to have the .NET 3.0 runtime components installed.
    • Are not cross-platform enabled. They will only run on Windows machines.
    • Support code-behind
    • Must run within IE (or use the IETab plugin for Firefox)


In my personal opinion, In general, I intend to use the technologies in the following environments:
WPFXBAPsWPF/E
Desktop solutionsIntranet ApplicationsInternet Applications
Organization specific gadgetsGeneral purpose gadgets

In general, WPF/E provides a more portable solution while currently sacrificing some of the functionality that XBAPs provide. In addition, XBAPs provide a slightly better developer experience simply because debugging JavaScript code can be somewhat tedious in comparison to debugging some code-behind pages.

How do you intend to use these technologies? I look forward to your comments.

Saturday, January 13, 2007

Misc - Major Discovery!

According to the Superhero Personality Quiz I am Spider-Man!


Spider-Man80%
Superman65%
Hulk60%
Batman50%
Robin50%
The Flash45%
Green Lantern45%
Iron Man45%
You are intelligent, witty, a bit geeky and have great
power and responsibility.
Spider-Man!


I won't count this as my post per week :)

Sunday, January 07, 2007

WPF - How to distinguish a Grid from a Table

Recently, while perusing the WPF reference documentation, I noticed that WPF provides both a Grid and a Table control. I was very interested in comparing and contrasting the two as initially, I believed the two were almost synonymous. However, neither control provides the complete functionality of the other. This posting will help you learn how to distinguish between a Grid and a Table. Alot of this information is available from the Grid definition page on MSDN.

A Grid provides the following features over the Table:


  • Element can be inserted by row and column indexes.
  • Content can be layered within a single cell.
  • Children can be relatively positioned to an upper-left corner of a cell

A Table provides the following features over the Grid:
  • Built-in support for paging
  • Built-in support for table headers
  • Built-in support for table footers.

Essentially, a Grid is used for Layout and a Table is used Data. If you know of other differences, please post them in the comments and I will be glad to update this post.

Monday, January 01, 2007

Cornucopia 2007

Happy New Year!

I wanted to set some expectations for this blog in the upcoming year as well as some of the goals I am shooting for.

  • At least one post per week.
  • Be more active in the WPF Forum
  • If Visual Studio "Orcas" is released this year, I would like to present to "How-to" videos throuh this blog.
  • Complete a useful XBAP component
  • Create an entire site utilizing WPF/E

It's going to be a busy and exciting year!

Wednesday, December 20, 2006

WPF - How to Programmatically Work With Attached Properties

The purpose of this post is to explain how to programmatically manipulate attached properties. I recently learned about them from the XAML side, however, I began to question how to use them from actual code. I really like the fact that XAML essentially maps Objects-to-Elements and Object Properties-to-Element Attributes. Then I saw these attached properties and I had to do some investigating to figure out how to manipulate these types of values from code. It's actually pretty easy, but you have to do it once to know how to do it. So I thought I would share my new found knowledge. The code used in this posting is available here. For an overview of Attached Properties, go here.

As a proof-of-concept, I created an application that simply displays a ComboBox that displays the available columns. The user can select a column and press the "Update" button. When the "Update" button is selected, the ComboBox will move to the selected column. The application looks like the following (I know it's ugly, but I've also been playing with some of the LinearGradientBrush stuff).

The XAML code that is of interest looks like the following (please bear in mind this is just a snippet and not the whole thing):

The Attached Properties in the code snipped used above are Grid.Row and Grid.Column. These properties define where in the grid the ComboBox is displayed. In order to set the attached property from the code behind, I had to essentially use 1 (yes one) line of code in the Click event of the Button. That line of code looks like the following:
Grid.SetColumn(ColumnComboBox, selectedIndex);
selectedIndex is just an integer set from the selected value of the combo box.

The "magic" occurs because Attached Properties essentially call static methods of an object. The static method is always named in the same manner. It is defined as ObjectType.SetNameOfProperty. So from the example, the ObjectType is Grid and the NameOfProperty is Column. Pretty kewl.

Saturday, December 16, 2006

Windows Presentation Foundation (WPF) - Why should I use it?

The "why" question was recently asked within the WPF Forum. It is an extremely valid and important question. I think it would be hard to adequately answer this question within a single blog post. However, when trying to explain "why" something is important, I try to stick to a "2-minute" rule. I pretend that I have two minutes to get my point across.

I really believe that WPF spans beyond just eye-candy (though it does let you make some pretty slick looking stuff) and provides value for all types of applications. This post is far from a complete answer to the "why" question, for more information, I would recommend this great article . However, let's pretend I have two minutes to explain to an executive why I believe this platform should be used... (2 minutes begins now).

Productivity - WPF is a unified platform for UI development. Currently, two of the most used UI development infrastructures (ASP.NET and Windows Forms) provide two very different development experiences. If you need a browser-based application, one skillset is needed and if you need a Windows Forms application, another type of skillset is needed. With WPF, acquired UI development skills can be leveraged across varying application types.

Usability - It's been said that "a picture is worth a thousand words" and the built-in animation and media capabilities of WPF provide the opportunity for assisting both learning and experienced application users. Animations can be used to create illustrations that more effectively communicate items such as sales and marketing trends. In addition, the built-in support for a variety of audio and video types can be leveraged to easily distribute "how-to" videos within an application. This is a massive value add that can drastically improve an application's help documentation. If users are frustrated by an application, they are more likely to find an alternative.

Another one of the great features of WPF is the utilization of vector based graphics. Vector based graphics can address the needs of an aging audience that may have less than perfect eyesight, by providing the opportunity for fonts and certain images to scale in size.

Branding - WPF also helps in creating applications that really match the identity of an organization. Take a look at a corporate logo, generally it uses either a non-web friendly font, incorporates curves/rounded edges, and/or a gradient. While all of this stuff can be done on Windows Forms and Web applications, they can be somewhat difficult to accomplish and often times require compromises. With WPF, shapes and gradients are part of the platform! In addition, by utilizing vector graphics, this branding is scalable.

In addition, WPF provides an excellent opportuntiy to get designers involved in the process by incorporating a model/view architecture. By incorporating designers, UIs can be more relevant, more engaging, and more distinct. (thanks goes to Rei Miyasaka for mentioning this in the comments).

Distribution - WPF also provides the opportunity to distribute an application to a wide variety of user end points. For instance, WPF can be used for desktop applications, intranet/internet applications and Windows Media Center applications.

(end 2 minutes).

After two minutes, only the surface has been scratched. However, before ending this post, I want to mention a facet of productivity that I feel is often overlooked, the availability of community. The .NET community is large and growing. Between the user groups, the forums, and the blogs, I believe that the availability of assistance when needed is one thing that makes the this platform standout over others.

Another thing that I feel often gets overlooked is the fact that there is innovation within integration. Often times integration alleviates ambiguity. This alleviation is a massive value-add that is very hard to calculate. However, I feel that the WPF platform really hits on this concept of innovation through integration. There are other platforms that can do similar things. Some of these platforms can do certain things better. However, I believe if you take into account the entire picture, that is where I feel true value of WPF lies.

I look forward to the comments on this post!

Sunday, December 10, 2006

Windows Workflow - Design - Best Practice?

The purpose of this post is to define what seems to be a useful approach when designing workflows that contain activities that you may want to reuse, that use some common values. Essentially, I needed something like a "Session" variable within my workflow. If I figure out a better way, I will blog about it, until then...

Essentially, I've been working on a workflow that contains a number of activities that I may want re-use. In order to accomplish this, it is important to develop each activity so that it is autonomous.

The problem that I have run into is, I essentially need something like the "Session" variable from ASP.NET (documentation). Because of the design of the workflow, and the desire to reuse these activities, there are some values that I need to retrieve after an activity is run, through a code activity and use that value in 1 or more activities down the road. Personally, I couldn't find any built in functionality into Windows Worflow to allow you to do this. If someone knows of a better way, please post a comment. For now, you can download the source code that will be used in this post here.

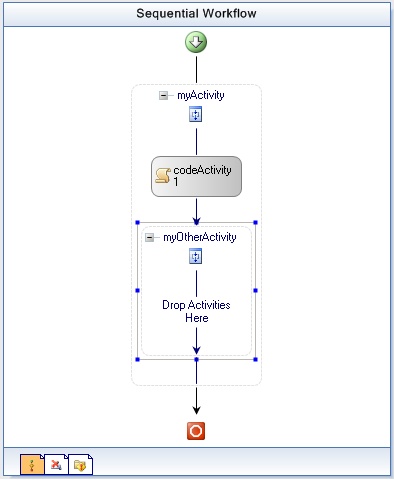
In order to display how I have accomplished this "Session" variable, let's extend the workflow from 11-21-2006 to make our workflow look like the following:


Essentially, the purpose of "myActivity" is simply to set the first/last name information. The purpose of the "codeActivity1" is to create an e-mail address based upon the first and last name entered into myActivity. Finally, "myOtherActivity" is responsible for displaying the user's newly generated e-mail address.

Essentially, it will make the most sense to review the code knowing that:

  • We are trying to create "Session" type functionality
  • There maybe a better way to do this particular example, however, it's purpose is to display the "Session" type functionality.


Now to walk through the code. The first step is to setup a "Session" variable within the workflow. This step is implemented by inserting the following code into the "MyWorkflow.cs" file.

// Contains the information to be used throughout the workflow
private Dictionary<string, object> session = new Dictionary<string, object>();
public Dictionary<string, object> Session
{
  get { return session; }
  set { session = value; }
}


Next, the "codeActivity1" "ExecuteCode" method is set to call "SetEmailAddress". The "SetEmailAddress" method is defined within "MyWorkflow.cs" and looks like the following:


public void SetEmailAddress(object sender, EventArgs e)
{
  // Pretend that this value is retrieved from some external
  // data source (database, registry, web service, etc)
  string emailAddress = firstName.ToLower() + "." +
    lastName.ToLower() + "@domain.com";
  session["EmailAddress"] = emailAddress;
}


After implementing the preceeding code, the magic happens within the "MyOtherActivity.cs" file. A new method called "HydrateProperties" has been added. This method is called right at the start of the "Execute" method. "HydrateProperties" is defined as follows:

private void HydrateProperties()
{
  // Retrieve the root activity (the actual workflow activity)
  Activity workflowActivity = this;
  while (workflowActivity.Parent != null)
    workflowActivity = workflowActivity.Parent;
  MyWorkflow myWorkflow = (MyWorkflow)(workflowActivity);

  // Based upon your precedence needs, you may want to only set a property from
  // the session if it has not been set from the workflow designer. If you want to set
  // the property no matter what, just remove the "if" statement.
  if (EmailAddress.Trim().Length == 0)
    EmailAddress = Convert.ToString(myWorkflow.Session["EmailAddress"]);
}


That's it! I hope this helps and if you come across a similar situation. In addition, if you know of a more recommended approach, please post some info within the comments.

You can download the source code for this example here.