Thursday, November 23, 2006

Windows Presentation Foundation - How to display a static HTML page

Recently, I was working on a WPF application within which I needed to display a pre-existing HTML page within my WPF browser application. This task reminded me of the importance of removing assumptions when working with a new technology. The following posting explains how to integrate a pre-existing web page into a WPF browser application. This topic touches upon the information further explained on the MSDN site here.

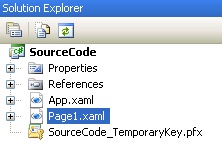
To begin with, a solution will be created which contains a single XAML Browser Application that contains:
  • App.xaml - The default application definition file
  • Page1.xaml - A default WPF page added by Visual Studio.


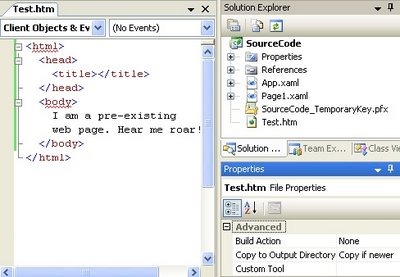
Before altering the code of the Page1.xaml file, we will add an HTML file that will serve as the HTML file that we want to display within the WPF browser application. After adding "Test.htm" to the project, You will need to right-click on the "Test.htm" file within the Solution Explorer. From the context menu, select "Properties". Within the "Properties" area, the following file properties need to have the corresponding values. A summary of all of the changes is displayed in the image below the property information.


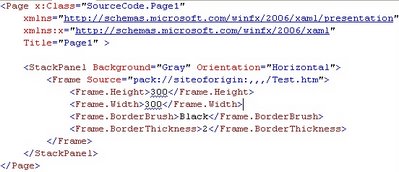
Now the fun begins. The Page1.xaml file needs to be edited to include the following XAML code (I apologize for using an image. The XAML code messes up the template provided by my blog provider):

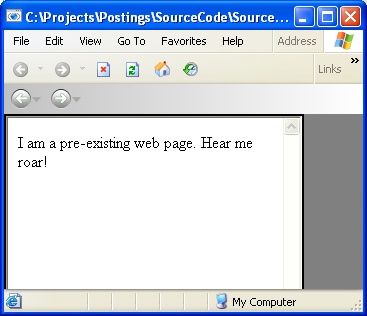
As you can see from the image below, we have successfully displayed a static web page within a WPF application. The way that this is accomplished is through the use of Resources. Within in our particular walk-through, the key factors are:
  • Frame element - This houses the HTML file.
  • Utilizing the Source property with the "siteoforigin" authority

  • Setting the "Copy to Output Directory" property to copy the file to the output directory.

Utilization of Resources within WPF is incredibly important. The subject of this posting displays how to accomplish a very specific task. The methods displayed on this posting vary greatly based upon what you resource you may be using and how you intend to use the resource. I strongly recommend learning more about resources if your desired task strays beyond the content displayed in this posting.. The source code from this example is available here.

Tuesday, November 21, 2006

Windows Workflow - Activity Binding - Take 2

Yesterday I presented a solution in regards to how to implement Activity Binding. One thing I did, which is generally a "no-no" is the fact that I modified the .designer.cs file. The reason I did this was simply because I wanted to have an understanding of how Activity Binding works as well as how the link from a workflow to a dependency property within a custom activity is handled.

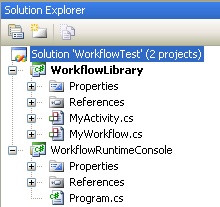
Now that the I have shown the "wrong" way, I want to show the "correct" way. To begin with, I have setup a solution which contains:
  • A console application that will
    • Prompt the user for their first name
    • Prompt the user for their last name
    • Host a custom workflow (referred to as "MyWorkflow") that is responsible for greeting the user by their first and last name.
  • A class library which contains:
    • The custom workflow ("MyWorkflow")
    • The custom activity (referred to as "MyActivity"), which will be responsible for greeting the user by their first and last name.

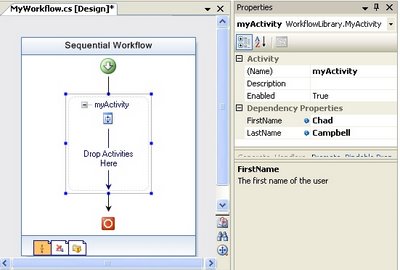
The next step is to add our custom activity ("MyActivity") to the custom workflow ("MyWorkflow") throw the visual designer. Then, we are ready to implement the properties which we wish to make visible to the runtime environment of our workflow ("MyWorkflow"). Essentially, we are going to define which properties we want to allow activity binding to be utilized. The properties of the activity that we want to expose for activity binding must be defined as DependencyProperty items.

In our example, I have created two DependencyProperty items: FirstName and LastName. One thing you can immediately notice from the image displayed below is that these properties can be set through the visual designer. The FirstName and LastName properties are in the "Dependency Properties" category.
At this point, we have exposed the properties to the workflow. However, we need to expose our properties such that applications that interact with our workflow ("MyWorkflow") can set these properties. In order to do this, we need to make public properties available at the workflow level. These properties are going to be defined in the way that is typical within a .NET class. For the sake of clarity, the below image displays what I mean by this:
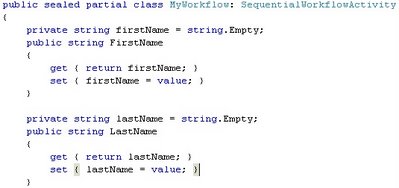
Now that we have created properties visible at the workflow level, we need to establish the binding between our custom workflow's property and our custom activity's property. The good news is, this is incredibly easy.
The first step is, within Visual Studio, select the activity within the workflow. Then select the property you wish to bind. You will notice ellipsis appear next to the property. You can see all of this in the image below. Notice the ellipses next to the "FirstName" property value.
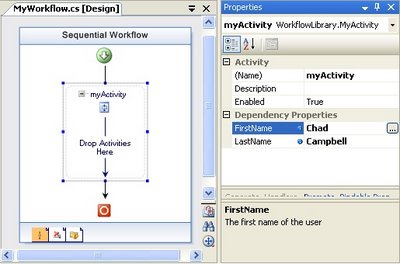
Next, you will select the ellipsis and a dialog will appear. This dialog is what will create the activity binding between our workflow property and our activity's property. Pretty slick eh? I was impressed. Below is a screen shot of the dialog you can expect.
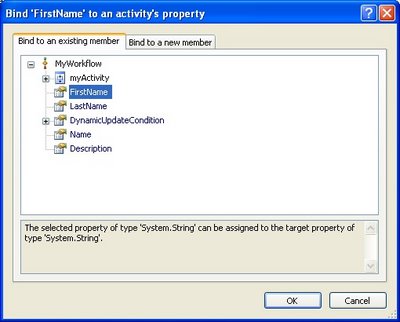
After creating our binding, we are ready to see if it works. In order to test it, there are a couple of things we need to do in the case of our console application example.

First, We will override the "Execute" method within our custom activity to display the "Hello " where is the value of our first name property and is the value of our last name property respectively.

Second, in order to pass the parameters from the console application to the workflow, we must utilize the Dictionary object. The code below is the body of the "Main" method of the Program.cs file of our console application:

Console.Write("First Name: ");
string firstName = Console.ReadLine();

Console.Write("Last Name: ");
string lastName = Console.ReadLine();

Dictionary parameters = new Dictionary();
parameters.Add("FirstName", firstName);
parameters.Add("LastName", lastName);

using (WorkflowRuntime workflowRuntime = new WorkflowRuntime())
{
  // Run the workflow
  WorkflowInstance workflowInstance =
    workflowRuntime.CreateWorkflow(typeof(MyWorkflow), parameters);
  Console.WriteLine("Beginning workflow...");
  workflowInstance.Start();
}


And that's it! Our resulting output looks like the following:
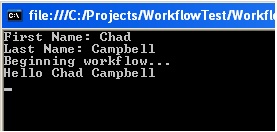
I hope this walk-through of implementing Activity Binding was helpful. You can download the code here.
Monday, November 20, 2006

Windows Workflow - Activity Binding - The Long Road

This evening I had the opportunity to learn about a powerful feature within Windows Workflow. The feature is called "Activity Binding". The intent of this posting is to outline an efficient approach and provide some sample code for implementing Activity Binding within your workflow that houses a custom activity. Considering the intent of this blog is to provide more task based examples, I will author an article explaining what Activity Binding is, and why you would use it at a later date. However, this blog entry will explain the how.

In order to implement activity binding between a custom activity and your workflow, the following steps are necessary. It is assumed that you are creating the activity from scratch. However, you may skip to "Prepare your workflow" if you are simply trying to implement Activity Binding to a DependencyProperty.
  • Prepare your custom activity
    • You must define the property that you want to bind to as a DependencyProperty.

  • Prepare your workflow
    • In the .designer.cs file, add an ActvityBind entity for the custom activity's property that you exposed.
    • Set the Name property of the ActivityBind entity.
    • Set the Path property of the ActivityBind entity. The path is essentially name of the publicly visible property that you want to bind to.
    • Ensure that the custom activity has been instantiated within your workflow.
    • Call the SetBinding method of the instantiated custom activity to bind the property of the activity to the workflow.

Within your MyActivity.cs file, you will have something that looks like the following:

public static DependencyProperty NameProperty =
  DependencyProperty.Register("Name", typeof(String),
  typeof(MyActivity));

[Description("The description of NameProperty")]
[DesignerSerializationVisibility(DesignerSerializationVisibility.Visible)]
[Browsable(true)]
public string Name
{
  get
  {
    return (String)(base.GetValue(MyActivity.NameProperty));  }
  set
  {
    SetValue(MyActivity.NameProperty, value);
  }
}

Within the InitializeComponent() of your workflow (in the .designer.cs):

// Setup the binding information
ActivityBind nameActivityBind = new ActivityBind();
nameActivityBind.Name = "MyWorkflow";
nameActivityBind.Path = "Name";

// Setup the link between the workflow and the
// custom property of the custom activity
// Assume that this.activity is an instance of MyActivity
this.activity = new MyActivity();
this.activity.SetBinding(MyActivity.NameProperty,
  ((ActivityBind)(nameActivityBind)));