Wednesday, December 20, 2006

WPF - How to Programmatically Work With Attached Properties

The purpose of this post is to explain how to programmatically manipulate attached properties. I recently learned about them from the XAML side, however, I began to question how to use them from actual code. I really like the fact that XAML essentially maps Objects-to-Elements and Object Properties-to-Element Attributes. Then I saw these attached properties and I had to do some investigating to figure out how to manipulate these types of values from code. It's actually pretty easy, but you have to do it once to know how to do it. So I thought I would share my new found knowledge. The code used in this posting is available here. For an overview of Attached Properties, go here.

As a proof-of-concept, I created an application that simply displays a ComboBox that displays the available columns. The user can select a column and press the "Update" button. When the "Update" button is selected, the ComboBox will move to the selected column. The application looks like the following (I know it's ugly, but I've also been playing with some of the LinearGradientBrush stuff).

The XAML code that is of interest looks like the following (please bear in mind this is just a snippet and not the whole thing):

The Attached Properties in the code snipped used above are Grid.Row and Grid.Column. These properties define where in the grid the ComboBox is displayed. In order to set the attached property from the code behind, I had to essentially use 1 (yes one) line of code in the Click event of the Button. That line of code looks like the following:
Grid.SetColumn(ColumnComboBox, selectedIndex);
selectedIndex is just an integer set from the selected value of the combo box.

The "magic" occurs because Attached Properties essentially call static methods of an object. The static method is always named in the same manner. It is defined as ObjectType.SetNameOfProperty. So from the example, the ObjectType is Grid and the NameOfProperty is Column. Pretty kewl.

Saturday, December 16, 2006

Windows Presentation Foundation (WPF) - Why should I use it?

The "why" question was recently asked within the WPF Forum. It is an extremely valid and important question. I think it would be hard to adequately answer this question within a single blog post. However, when trying to explain "why" something is important, I try to stick to a "2-minute" rule. I pretend that I have two minutes to get my point across.

I really believe that WPF spans beyond just eye-candy (though it does let you make some pretty slick looking stuff) and provides value for all types of applications. This post is far from a complete answer to the "why" question, for more information, I would recommend this great article . However, let's pretend I have two minutes to explain to an executive why I believe this platform should be used... (2 minutes begins now).

Productivity - WPF is a unified platform for UI development. Currently, two of the most used UI development infrastructures (ASP.NET and Windows Forms) provide two very different development experiences. If you need a browser-based application, one skillset is needed and if you need a Windows Forms application, another type of skillset is needed. With WPF, acquired UI development skills can be leveraged across varying application types.

Usability - It's been said that "a picture is worth a thousand words" and the built-in animation and media capabilities of WPF provide the opportunity for assisting both learning and experienced application users. Animations can be used to create illustrations that more effectively communicate items such as sales and marketing trends. In addition, the built-in support for a variety of audio and video types can be leveraged to easily distribute "how-to" videos within an application. This is a massive value add that can drastically improve an application's help documentation. If users are frustrated by an application, they are more likely to find an alternative.

Another one of the great features of WPF is the utilization of vector based graphics. Vector based graphics can address the needs of an aging audience that may have less than perfect eyesight, by providing the opportunity for fonts and certain images to scale in size.

Branding - WPF also helps in creating applications that really match the identity of an organization. Take a look at a corporate logo, generally it uses either a non-web friendly font, incorporates curves/rounded edges, and/or a gradient. While all of this stuff can be done on Windows Forms and Web applications, they can be somewhat difficult to accomplish and often times require compromises. With WPF, shapes and gradients are part of the platform! In addition, by utilizing vector graphics, this branding is scalable.

In addition, WPF provides an excellent opportuntiy to get designers involved in the process by incorporating a model/view architecture. By incorporating designers, UIs can be more relevant, more engaging, and more distinct. (thanks goes to Rei Miyasaka for mentioning this in the comments).

Distribution - WPF also provides the opportunity to distribute an application to a wide variety of user end points. For instance, WPF can be used for desktop applications, intranet/internet applications and Windows Media Center applications.

(end 2 minutes).

After two minutes, only the surface has been scratched. However, before ending this post, I want to mention a facet of productivity that I feel is often overlooked, the availability of community. The .NET community is large and growing. Between the user groups, the forums, and the blogs, I believe that the availability of assistance when needed is one thing that makes the this platform standout over others.

Another thing that I feel often gets overlooked is the fact that there is innovation within integration. Often times integration alleviates ambiguity. This alleviation is a massive value-add that is very hard to calculate. However, I feel that the WPF platform really hits on this concept of innovation through integration. There are other platforms that can do similar things. Some of these platforms can do certain things better. However, I believe if you take into account the entire picture, that is where I feel true value of WPF lies.

I look forward to the comments on this post!

Sunday, December 10, 2006

Windows Workflow - Design - Best Practice?

The purpose of this post is to define what seems to be a useful approach when designing workflows that contain activities that you may want to reuse, that use some common values. Essentially, I needed something like a "Session" variable within my workflow. If I figure out a better way, I will blog about it, until then...

Essentially, I've been working on a workflow that contains a number of activities that I may want re-use. In order to accomplish this, it is important to develop each activity so that it is autonomous.

The problem that I have run into is, I essentially need something like the "Session" variable from ASP.NET (documentation). Because of the design of the workflow, and the desire to reuse these activities, there are some values that I need to retrieve after an activity is run, through a code activity and use that value in 1 or more activities down the road. Personally, I couldn't find any built in functionality into Windows Worflow to allow you to do this. If someone knows of a better way, please post a comment. For now, you can download the source code that will be used in this post here.

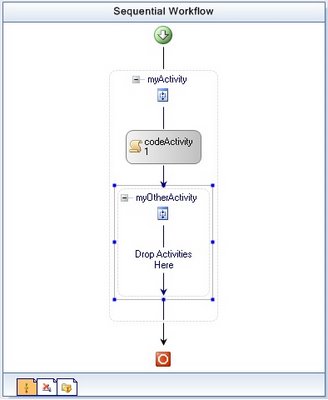
In order to display how I have accomplished this "Session" variable, let's extend the workflow from 11-21-2006 to make our workflow look like the following:


Essentially, the purpose of "myActivity" is simply to set the first/last name information. The purpose of the "codeActivity1" is to create an e-mail address based upon the first and last name entered into myActivity. Finally, "myOtherActivity" is responsible for displaying the user's newly generated e-mail address.

Essentially, it will make the most sense to review the code knowing that:

  • We are trying to create "Session" type functionality
  • There maybe a better way to do this particular example, however, it's purpose is to display the "Session" type functionality.


Now to walk through the code. The first step is to setup a "Session" variable within the workflow. This step is implemented by inserting the following code into the "MyWorkflow.cs" file.

// Contains the information to be used throughout the workflow
private Dictionary<string, object> session = new Dictionary<string, object>();
public Dictionary<string, object> Session
{
  get { return session; }
  set { session = value; }
}


Next, the "codeActivity1" "ExecuteCode" method is set to call "SetEmailAddress". The "SetEmailAddress" method is defined within "MyWorkflow.cs" and looks like the following:


public void SetEmailAddress(object sender, EventArgs e)
{
  // Pretend that this value is retrieved from some external
  // data source (database, registry, web service, etc)
  string emailAddress = firstName.ToLower() + "." +
    lastName.ToLower() + "@domain.com";
  session["EmailAddress"] = emailAddress;
}


After implementing the preceeding code, the magic happens within the "MyOtherActivity.cs" file. A new method called "HydrateProperties" has been added. This method is called right at the start of the "Execute" method. "HydrateProperties" is defined as follows:

private void HydrateProperties()
{
  // Retrieve the root activity (the actual workflow activity)
  Activity workflowActivity = this;
  while (workflowActivity.Parent != null)
    workflowActivity = workflowActivity.Parent;
  MyWorkflow myWorkflow = (MyWorkflow)(workflowActivity);

  // Based upon your precedence needs, you may want to only set a property from
  // the session if it has not been set from the workflow designer. If you want to set
  // the property no matter what, just remove the "if" statement.
  if (EmailAddress.Trim().Length == 0)
    EmailAddress = Convert.ToString(myWorkflow.Session["EmailAddress"]);
}


That's it! I hope this helps and if you come across a similar situation. In addition, if you know of a more recommended approach, please post some info within the comments.

You can download the source code for this example here.

Tuesday, December 05, 2006

WPF - How to get started with WPF/E (Dec CTP)

Below is the fastest step-by-step approach for beginning to develop WPF/E applications on a machine that has Windows XP SP2 and Visual Studio 2005 installed:
  • Download and install the update that allows Microsoft Visual Studio to support web application projects.
  • Download and install the web projects add-on for Visual Studio 2005.
  • Download and install the "WPF/E" SDK.
  • Run Start->All Programs->WPFE SDK->Tools->Install WPFE VS Template.
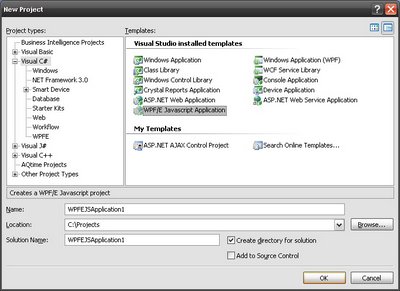
If you have ran these steps, you should be able to start Visual Studio 2005, go to File->New->Project... and see something like the following:

Monday, December 04, 2006

WPF - WPF/E CTP is Open for Business

It's a very exciting day if you've been anxiously awaiting on WPF/E!

The DevCenter Page is here!

Saturday, December 02, 2006

Windows Presentation Foundation - Forums - Achievement Unlocked

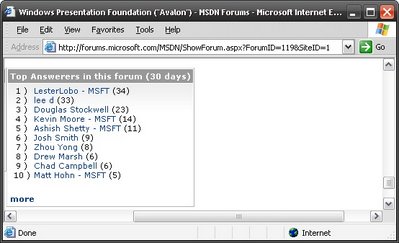
Well, much to my surprise, I logged into the MSDN WPF Forum this morning and I noticed that have made the top 10 answerers list.

I'm excited to help out the developer community! Keep the questions coming.

Thursday, November 23, 2006

Windows Presentation Foundation - How to display a static HTML page

Recently, I was working on a WPF application within which I needed to display a pre-existing HTML page within my WPF browser application. This task reminded me of the importance of removing assumptions when working with a new technology. The following posting explains how to integrate a pre-existing web page into a WPF browser application. This topic touches upon the information further explained on the MSDN site here.

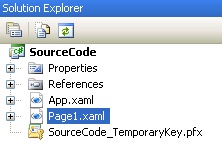
To begin with, a solution will be created which contains a single XAML Browser Application that contains:
  • App.xaml - The default application definition file
  • Page1.xaml - A default WPF page added by Visual Studio.


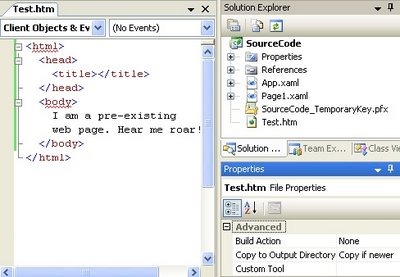
Before altering the code of the Page1.xaml file, we will add an HTML file that will serve as the HTML file that we want to display within the WPF browser application. After adding "Test.htm" to the project, You will need to right-click on the "Test.htm" file within the Solution Explorer. From the context menu, select "Properties". Within the "Properties" area, the following file properties need to have the corresponding values. A summary of all of the changes is displayed in the image below the property information.


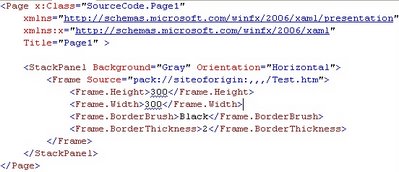
Now the fun begins. The Page1.xaml file needs to be edited to include the following XAML code (I apologize for using an image. The XAML code messes up the template provided by my blog provider):

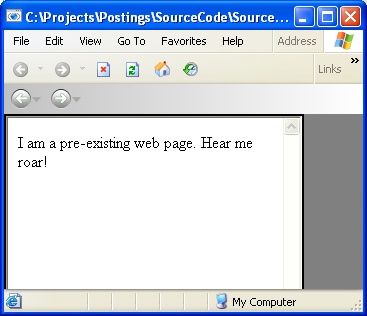
As you can see from the image below, we have successfully displayed a static web page within a WPF application. The way that this is accomplished is through the use of Resources. Within in our particular walk-through, the key factors are:
  • Frame element - This houses the HTML file.
  • Utilizing the Source property with the "siteoforigin" authority

  • Setting the "Copy to Output Directory" property to copy the file to the output directory.

Utilization of Resources within WPF is incredibly important. The subject of this posting displays how to accomplish a very specific task. The methods displayed on this posting vary greatly based upon what you resource you may be using and how you intend to use the resource. I strongly recommend learning more about resources if your desired task strays beyond the content displayed in this posting.. The source code from this example is available here.

Tuesday, November 21, 2006

Windows Workflow - Activity Binding - Take 2

Yesterday I presented a solution in regards to how to implement Activity Binding. One thing I did, which is generally a "no-no" is the fact that I modified the .designer.cs file. The reason I did this was simply because I wanted to have an understanding of how Activity Binding works as well as how the link from a workflow to a dependency property within a custom activity is handled.

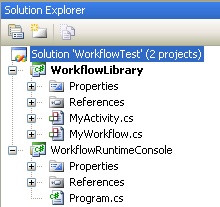
Now that the I have shown the "wrong" way, I want to show the "correct" way. To begin with, I have setup a solution which contains:
  • A console application that will
    • Prompt the user for their first name
    • Prompt the user for their last name
    • Host a custom workflow (referred to as "MyWorkflow") that is responsible for greeting the user by their first and last name.
  • A class library which contains:
    • The custom workflow ("MyWorkflow")
    • The custom activity (referred to as "MyActivity"), which will be responsible for greeting the user by their first and last name.


The next step is to add our custom activity ("MyActivity") to the custom workflow ("MyWorkflow") throw the visual designer. Then, we are ready to implement the properties which we wish to make visible to the runtime environment of our workflow ("MyWorkflow"). Essentially, we are going to define which properties we want to allow activity binding to be utilized. The properties of the activity that we want to expose for activity binding must be defined as DependencyProperty items.

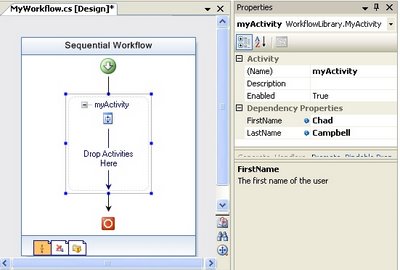
In our example, I have created two DependencyProperty items: FirstName and LastName. One thing you can immediately notice from the image displayed below is that these properties can be set through the visual designer. The FirstName and LastName properties are in the "Dependency Properties" category.
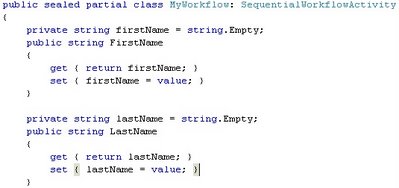
At this point, we have exposed the properties to the workflow. However, we need to expose our properties such that applications that interact with our workflow ("MyWorkflow") can set these properties. In order to do this, we need to make public properties available at the workflow level. These properties are going to be defined in the way that is typical within a .NET class. For the sake of clarity, the below image displays what I mean by this:
Now that we have created properties visible at the workflow level, we need to establish the binding between our custom workflow's property and our custom activity's property. The good news is, this is incredibly easy.
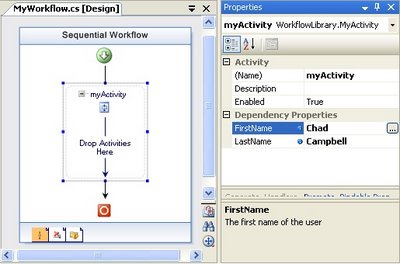
The first step is, within Visual Studio, select the activity within the workflow. Then select the property you wish to bind. You will notice ellipsis appear next to the property. You can see all of this in the image below. Notice the ellipses next to the "FirstName" property value.
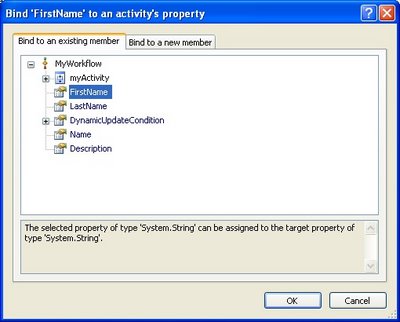
Next, you will select the ellipsis and a dialog will appear. This dialog is what will create the activity binding between our workflow property and our activity's property. Pretty slick eh? I was impressed. Below is a screen shot of the dialog you can expect.

After creating our binding, we are ready to see if it works. In order to test it, there are a couple of things we need to do in the case of our console application example.

First, We will override the "Execute" method within our custom activity to display the "Hello " where is the value of our first name property and is the value of our last name property respectively.

Second, in order to pass the parameters from the console application to the workflow, we must utilize the Dictionary object. The code below is the body of the "Main" method of the Program.cs file of our console application:

Console.Write("First Name: ");
string firstName = Console.ReadLine();

Console.Write("Last Name: ");
string lastName = Console.ReadLine();

Dictionary parameters = new Dictionary();
parameters.Add("FirstName", firstName);
parameters.Add("LastName", lastName);

using (WorkflowRuntime workflowRuntime = new WorkflowRuntime())
{
  // Run the workflow
  WorkflowInstance workflowInstance =
    workflowRuntime.CreateWorkflow(typeof(MyWorkflow), parameters);
  Console.WriteLine("Beginning workflow...");
  workflowInstance.Start();
}


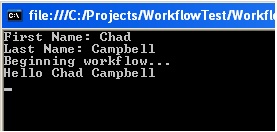
And that's it! Our resulting output looks like the following:

I hope this walk-through of implementing Activity Binding was helpful. You can download the code here.

Monday, November 20, 2006

Windows Workflow - Activity Binding - The Long Road

This evening I had the opportunity to learn about a powerful feature within Windows Workflow. The feature is called "Activity Binding". The intent of this posting is to outline an efficient approach and provide some sample code for implementing Activity Binding within your workflow that houses a custom activity. Considering the intent of this blog is to provide more task based examples, I will author an article explaining what Activity Binding is, and why you would use it at a later date. However, this blog entry will explain the how.

In order to implement activity binding between a custom activity and your workflow, the following steps are necessary. It is assumed that you are creating the activity from scratch. However, you may skip to "Prepare your workflow" if you are simply trying to implement Activity Binding to a DependencyProperty.
  • Prepare your custom activity
    • You must define the property that you want to bind to as a DependencyProperty.

  • Prepare your workflow
    • In the .designer.cs file, add an ActvityBind entity for the custom activity's property that you exposed.
    • Set the Name property of the ActivityBind entity.
    • Set the Path property of the ActivityBind entity. The path is essentially name of the publicly visible property that you want to bind to.
    • Ensure that the custom activity has been instantiated within your workflow.
    • Call the SetBinding method of the instantiated custom activity to bind the property of the activity to the workflow.

Within your MyActivity.cs file, you will have something that looks like the following:

public static DependencyProperty NameProperty =
  DependencyProperty.Register("Name", typeof(String),
  typeof(MyActivity));

[Description("The description of NameProperty")]
[DesignerSerializationVisibility(DesignerSerializationVisibility.Visible)]
[Browsable(true)]
public string Name
{
  get
  {
    return (String)(base.GetValue(MyActivity.NameProperty));  }
  set
  {
    SetValue(MyActivity.NameProperty, value);
  }
}

Within the InitializeComponent() of your workflow (in the .designer.cs):

// Setup the binding information
ActivityBind nameActivityBind = new ActivityBind();
nameActivityBind.Name = "MyWorkflow";
nameActivityBind.Path = "Name";

// Setup the link between the workflow and the
// custom property of the custom activity
// Assume that this.activity is an instance of MyActivity
this.activity = new MyActivity();
this.activity.SetBinding(MyActivity.NameProperty,
  ((ActivityBind)(nameActivityBind)));

Monday, October 23, 2006

DependencyProperty and DependencyObject

I’ll admit, the DependencyObject and DependencyProperty have been a bit difficult for me to grasp. However, it must be a big thing based on the way that Windows Workflow (WF) and Windows Presentation Foundation (WPF) utilize it. So I felt it important to blog about my experiences and discoveries around these classes.
Any class can be defined as a DependencyObject by simply deriving from it. But why would anyone want to do that? First off, we must understand that a DependencyObject is essentially a container for DependencyProperty items. I know, I know, that still doesn’t define why we would want to use them. So, let’s examine why we should use them.

Well, essentially, I had to envision how data binding in WPF works in order to understand why I would want to use this. Let’s pretend that we are creating a Windows Forms application (pre-WPF). Our Windows Forms application will contain a knob control that we’ve created and a media player. Our knob will adjust the volume of the media player. Well, traditionally, we would have to programmatically handle the event of adjusting the knob and when the knob adjusts, we must adjust the volume of the media player.

This is the Ah Ha moment… you see, if our knob control had a DependencyProperty called “VolumeLevel”, we could bind the media player’s volume setting to this property and voila! It’s automatically handled for you. When the value of “VolumeLevel” is altered, the volume setting of the media player will be changed as well. I like to think of a DependencyProperty as sort of a radio station that broadcasts the info to its listeners (i.e. the items that are binding to the property).

In addition to data binding, there are a number of other services you can take advantage of. I want to make sure to give credit where credit is due, so you may find a brief list of those services
here.

Sunday, October 22, 2006

.NET 3.0 Clinics

Microsoft is offering 3 virtual clinics for 3 of the 4 core components of the .NET 3.0 framework. They are available here.

I have taken the Windows Presentation Foundation and the Windows Workflow Foundation clinics and found them to be very beneficial. Especially if you are looking for a way to get started with these technologies. Has anyone else taken these courses? What are your thoughts?

WPF Custom Controls

Every new presentation technology demands pre-defined controls to provide developers the opportunity to get something done quickly.

The advent of any new programming model generates a great deal of excitement, and the Windows Presentation Foundation (WPF) is no exception. This powerful UI framework provides a plush set of controls to construct rich user experiences. The controls provided within this coding quiver will help you hit the mark for the majority of your UI targets.

Occasionally, you will come across a development requirement that you have not previously encountered. When this occurs, the need for a custom control may arise. I have written the following article to discuss how to write a custom control (here)